반응형
https://developer.android.com/reference/androidx/core/content/FileProvider
FileProvider

https://developer.android.com/topic/performance/graphics/load-bitmap?hl=ko
BitmapFactory.Options - 큰 비트맵을 효율적으로 로드
카메라로 사진을 찍기 위해 사용되는 방법은 두 가지로 나눌 수 있다
1. 인텐트로 단말의 카메라 앱을 실행한 후 결과 사진을 받아 처리하기
2. 앱 화면에 카메라 미리보기를 보여주고 직접 사진을 찍어 처리하기
스마트폰 단말에는 카메라 앱이 미리 설치되어 있는데, 이 앱을 사용하면 가장 간단하게 다른 기능의 앱을 구현할 수 있다
단말의 카메라 앱은 미리 만들어져 설치된 것이므로, 직접 만들려는 앱에서 카메라 앱의 화면을 띄우려면 인텐트를 만들어 시스템에 요청하면 된다
/app/res 폴더에 xml 폴더를 만들고, external.xml 파일 생성, Root element:에 paths 입력
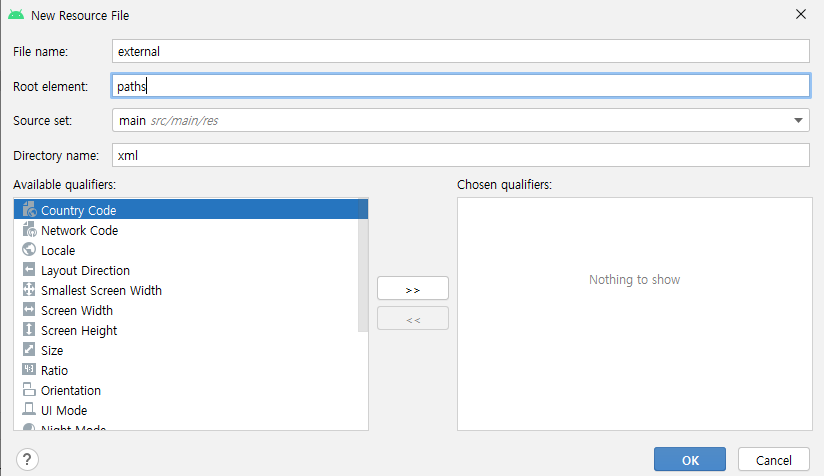
paths 태그는 cache-path, files-path, external-files-path 태그를 포함하고 있으며, 앱의 cache 폴더, files 폴더, externalFiles 폴더를 접근할 수 있도록 허용함
/app/res/xml/external.xml
<?xml version="1.0" encoding="utf-8"?>
<paths xmlns:android="http://schemas.android.com/apk/res/android">
    <cache-path
        name="cache"
        path="/" />
    <files-path
        name="files"
        path="/" />
    <external-files-path
        name="external_paths"
        path="." />
</paths>
AndroidManifest.xml
<?xml version="1.0" encoding="utf-8"?>
<manifest xmlns:android="http://schemas.android.com/apk/res/android"
    package="com.example.a71_captureintent">

    <application
        android:allowBackup="true"
        android:icon="@mipmap/ic_launcher"
        android:label="@string/app_name"
        android:roundIcon="@mipmap/ic_launcher_round"
        android:supportsRtl="true"
        android:theme="@style/Theme.A71_CaptureIntent">
        <activity android:name=".MainActivity" android:exported="true">
            <intent-filter>
                <action android:name="android.intent.action.MAIN" />

                <category android:name="android.intent.category.LAUNCHER" />
            </intent-filter>
        </activity>

        <provider
            android:name="androidx.core.content.FileProvider"
            android:authorities="${applicationId}"
            android:exported="false"
            android:grantUriPermissions="true">
            <meta-data
                android:name="android.support.FILE_PROVIDER_PATHS"
                android:resource="@xml/external" />
        </provider>

    </application>

</manifest>
        <provider
            android:name="androidx.core.content.FileProvider"
            // provier 태그의 name 속성이 androidx.core.content.FileProvider 클래스 지정하고 있다
            // 이것은 FileProvider로 특정 폴더를 공유하는 데 사용하는 내용 제공자이다

            android:authorities="${applicationId}"
            // authorities 속성의 값으로 ${applicationId} - 이 앱의 패키지 이름

            android:exported="false"
            android:grantUriPermissions="true">

            <meta-data
                android:name="android.support.FILE_PROVIDER_PATHS"
                android:resource="@xml/external" />
        </provider>
activity_main
<?xml version="1.0" encoding="utf-8"?>
<LinearLayout xmlns:android="http://schemas.android.com/apk/res/android"
    xmlns:app="http://schemas.android.com/apk/res-auto"
    xmlns:tools="http://schemas.android.com/tools"
    android:layout_width="match_parent"
    android:layout_height="match_parent"
    android:orientation="vertical"
    tools:context=".MainActivity">

    <Button
        android:id="@+id/button"
        android:layout_width="wrap_content"
        android:layout_height="wrap_content"
        android:layout_gravity="center"
        android:text="사진찍기" />

    <ImageView
        android:id="@+id/imageView"
        android:layout_width="match_parent"
        android:layout_height="match_parent"
        app:srcCompat="@mipmap/ic_launcher" />
</LinearLayout>
MainActivity
package com.example.a71_captureintent;

import androidx.annotation.Nullable;
import androidx.appcompat.app.AppCompatActivity;
import androidx.core.content.FileProvider;

import android.content.Intent;
import android.graphics.Bitmap;
import android.graphics.BitmapFactory;
import android.net.Uri;
import android.os.Build;
import android.os.Bundle;
import android.provider.MediaStore;
import android.util.Log;
import android.view.View;
import android.widget.Button;
import android.widget.ImageView;

import java.io.File;

public class MainActivity extends AppCompatActivity {

    ImageView imageView;
    File file;

    Uri uri;

    @Override
    protected void onCreate(Bundle savedInstanceState) {
        super.onCreate(savedInstanceState);
        setContentView(R.layout.activity_main);

        imageView = findViewById(R.id.imageView);

        Button button = findViewById(R.id.button);
        button.setOnClickListener(new View.OnClickListener() {
            @Override
            public void onClick(View view) {
                takePicture();
            }
        });
    }

    public void takePicture() {
        try {
            file = createFile();

            if (file.exists()) {
                file.delete();
            }

        } catch (Exception e) {
            e.printStackTrace();
        }

//        File 객체로부터 Uri 객체 만들기
        if (Build.VERSION.SDK_INT >= 24) {
//            FileProvider는 ContentProvider를 상속받는다
            uri = FileProvider.getUriForFile(this, "com.example.a71_captureintent", file);
        } else {
            uri = Uri.fromFile(file);
        }

//        단말의 카메라 앱을 띄어달라는 액션 정보를 인텐트에 담음
        Intent intent = new Intent(MediaStore.ACTION_IMAGE_CAPTURE);

        intent.addFlags(Intent.FLAG_GRANT_READ_URI_PERMISSION);
        intent.putExtra(MediaStore.EXTRA_OUTPUT, uri);
        startActivityForResult(intent, 101);

    }

    //    파일 생성
//    생성한 파일을 카메라 앱이 사용할 때는 다른 앱에서 파일을 공유해야 하므로 Content Provider를 만들어 해당 폴더를 공유할 수 있게 해야함
//    /app/res/xml/external.xml 추가, AndroidManifest.xml 수정
    private File createFile() {
        String filename = "capture.jpg";
        File outFile = new File(getFilesDir(), filename);
        Log.d("Main", "File path : " + outFile.getAbsolutePath());

        return outFile;
    }

    @Override
    protected void onActivityResult(int requestCode, int resultCode, Intent data) {
        super.onActivityResult(requestCode, resultCode, data);

        if (requestCode == 101 && resultCode == RESULT_OK) {
//            Bitmap 객체로 메모리에 이미지를 생성할때, BitmapFactory.Options 객체로
//            inSamplesize를 이용하여 1/8 크기로 축소된 것을 메모리에 생성
            BitmapFactory.Options options = new BitmapFactory.Options();
            options.inSampleSize = 8;
            Bitmap bitmap = BitmapFactory.decodeFile(file.getAbsolutePath(), options);

            imageView.setImageBitmap(bitmap);
        }
    }
}

반응형
'안드로이드' 카테고리의 다른 글
| 음악 파일 재생 (0) | 2021.11.05 |
|---|---|
| 화면에 카메라 미리보기 넣기 (0) | 2021.11.05 |
| 멀티터치 이미지 뷰어 만들기 (0) | 2021.11.03 |
| 페인트보드(그림판) 만들기 (0) | 2021.11.02 |
| BtimapFactory 클래스 (0) | 2021.11.02 |