스마트폰을 사용하다 보면 Play 스토어나 앱 마켓에서 설치한 앱의 업데이트가 있다는 메세지를 종종 보게 된다
단말의 위쪽 부분에 보이는 상태바 부분에 업데이트에 대한 메세지가 표시되면 사용자는 업데이트를 할 것인가의 여부를 결정하게 된다
단말로 메세지를 보내는 기술적인 방법에는 세 가지가 있다
단순 SMS를 이용한 알림
- 간단하지만 비용이 발생할 수 있다

앱에서 서버에연결을 만들어 놓은 상태에서 알림
- 앱에서 서버와의 연결을 만들어 놓고 폴링하는 과정이 필요하며,
  백그라운드 서비스를 이용해 연결을 유지해야 하므로 간단하지 않다

구글의 푸시 서비스(FCM - Firebase Cloud Messaging)를 사용하여 알림
- 구글의 클라우드 서버를 사용해 메세지 전송 방식을 최적화한 서비스
  앱에서 서버로 직접 연결할 필요가 없으며 단말의 내부 연결을 공유하여 메세지를 수신하는 방식
푸시 서비스란 '업데이트가 있습니다'와 같은 메세지를 구글 클라우드 서버에서 구글 Play 스토어가 설치된 단말기로 보내주는 방식이다
그런데 이 푸시 서비스를 사용하는 각각의 앱은 구글 클라우드 서버에 직접 연결하지 않는다
단말에서 연결을 유지하고 있기 때문이다
만약 이 구글 서비스를 사용하지 않고 직접 구현하려면 단말에서 서버로 연결을 유지하면서 동시에 연결을 지속적으로 유지해야 한다
따라서 일정 시간 간격으로 연결이 끊어졌는지 검사하는 폴링(Polling) 메커니즘을 구현해야 한다
그런데 폴링 기능을 구현하게 되면 그 과정에서 단말의 하드웨어 리소스나 전원을 많이 소모하는 문제가 발생하게 된다
구글에서 제공하는 FCM을 사용하는 것이 효과적으로 푸시 메세지를 보내줄 수 있는 방법이 된다
1. 단말은 자신을 클라우드 서버에 등록하고 서버로부터 등록 id를 받는다

2. 등록 id는 메세지 전송을 담당할 애플리케이션 서버로 보낸 후 메세지를 기다린다

3. 보내려는 메세지는 애플리케이션 서버에서 클라우드에 접속한 후 전송한다

4. 클라우드 서버로 전송된 메세지는 대상 단말에 보내진다
예를 들어, 외근이 많은 영업사원의 단말을 클라우드 서버에 등록한 후 메세지를 기다리고, 영업팀장은 애플리케이션 서버를 통해 메세지를 클라우드 서버로 보내준다
그러면 클라우드 서버가 단말로 메세지를 보낸다
애플리케이션 서버란 단말에 푸시 메세지를 보내기 위해 직접 만든 서버 모듈을 말하는 것으로, 메세지 입력창과 전송 버튼이 하나 있는 PC용 프로그램을 떠올리면 이해가 쉽다
보통 웹 서버에 푸시 메세지를 전송하는 기능을 추가하여 구성하는 경우가 많다
이 애플리케이션 서버는 직접 단말로 메세지를 보낼 수 없으므로, 클라우드 서버를 통해 보내게 된다
애플리케이션 서버 -> 클라우드 서버 -> 단말의 형태를 띄게 된다
이 과정에서 두 가지 중요한 내용이 있다
1. 애플리케이션 서버에 저장된 단말의 id

2. 애플리케이션 서버에서 클라우드 서버로 접속하기 위한 인증 정보
애플리케이션 서버가 어떤 단말로 메세지를 보내줄 것인지에 대한 정보가 필요하다
이를 위해 단말이 클라우드 서버에 자신을 등록할 때 받게 되는 등록 id를 애플리케이션 서버에 알려주어야 한다
메세지를 전송할 때도 아무나 접속하여 단말로 메세지를 보내면 안되므로, 애플리케이션 서버가 API 키라는 고유한 값을 포함하여 메세지를 보내도록 해야한다
이 인증 정보는 어떤 사람이 어떤 서비스에 사용하는지 구별하기 위한 것이므로 개발자가 만드는 애플리케이션을 FCM 사이트에 등록해야 사용할 수 있다
https://console.firebase.google.com/?hl=ko파이어베이스 접속 - 프로젝트 추가
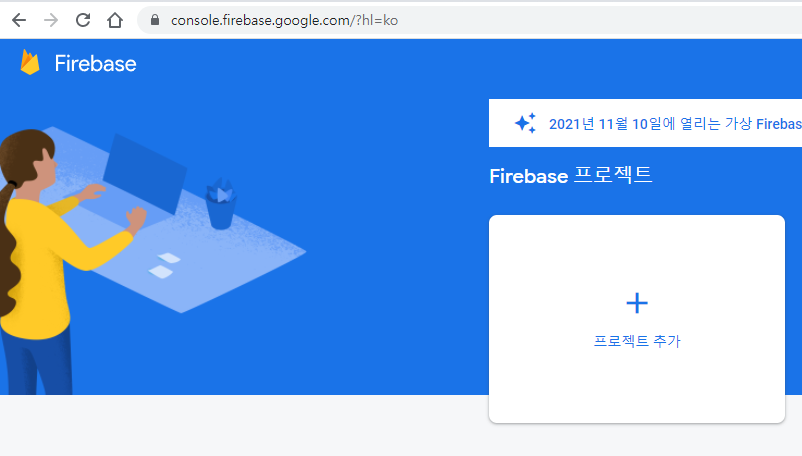
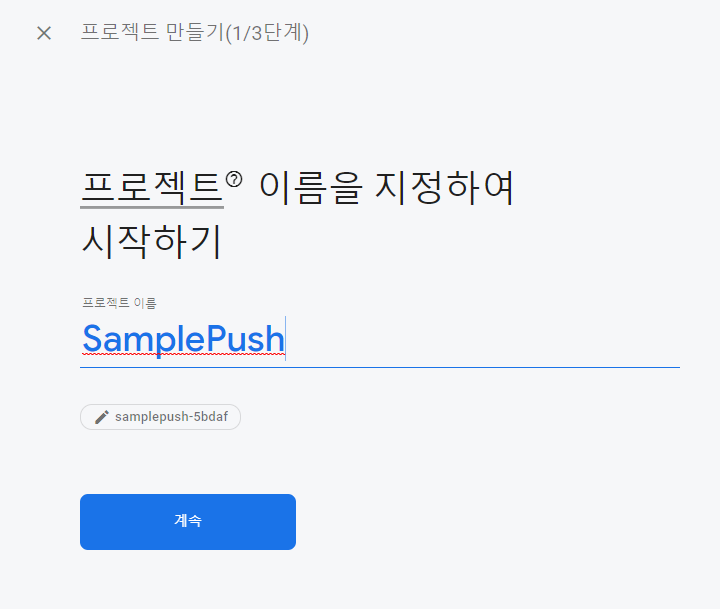
프로젝트 생성 후, 안드로이드 앱 추가

패키지 이름만 넣고 등록
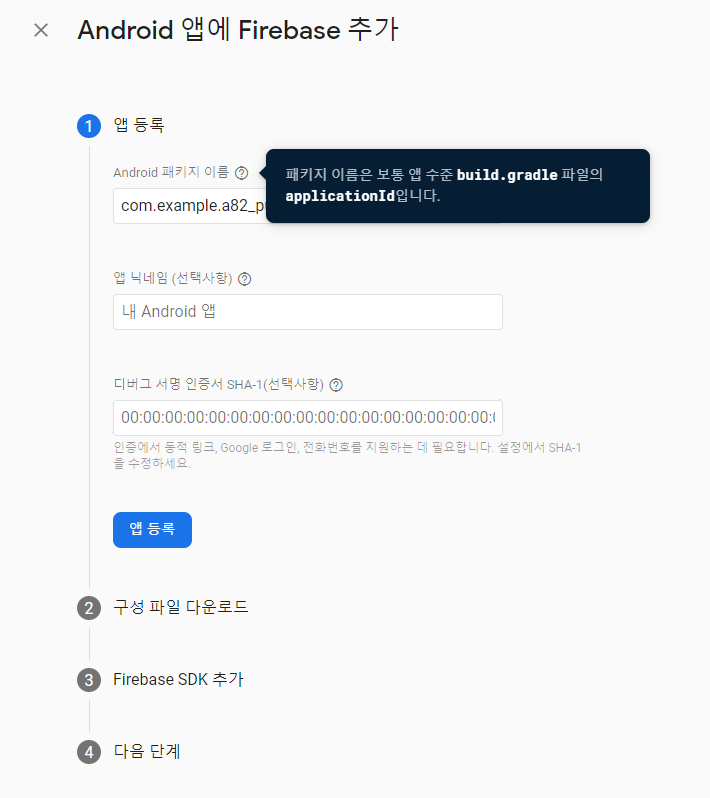
google-services.json 파일 다운로드

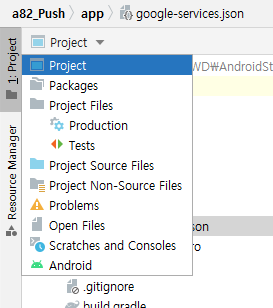
app 폴더 안에 google-services.json 파일 복사, 프로젝트 창이 Android일때는 모든 파일이 보이지 않으므로 Project로 변경하고 확인
다음을 누르고 3단계로 넘어가면 설명글이 표시된다
안드로이드 앱 프로젝트 안에서 설정이 추가로 필요하다는 내용이다
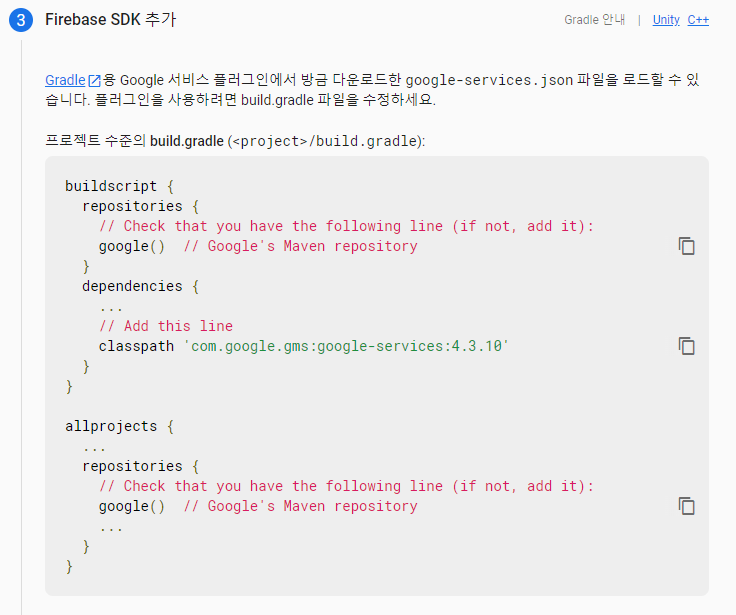

build.gradle(Project)
// Top-level build file where you can add configuration options common to all sub-projects/modules.
buildscript {
    repositories {

        // google() 있는지 확인
        google()

        mavenCentral()
    }
    dependencies {
        classpath "com.android.tools.build:gradle:4.2.0"

        // 추가
        classpath 'com.google.gms:google-services:4.3.10'

        // NOTE: Do not place your application dependencies here; they belong
        // in the individual module build.gradle files
    }
}

allprojects {
    repositories {

        // google() 있는지 확인
        google()

        mavenCentral()
        jcenter() // Warning: this repository is going to shut down soon
    }
}

task clean(type: Delete) {
    delete rootProject.buildDir
}
build.gradle(Module)
plugins {
    id 'com.android.application'

    // 추가
    id 'com.google.gms.google-services'
}

...

dependencies {
	...

    // 추가
    implementation platform('com.google.firebase:firebase-bom:29.0.0')
    implementation 'com.google.firebase:firebase-messaging'
    implementation 'com.google.firebase:firebase-analytics'
}
https://firebase.google.com/docs/cloud-messaging/android/client?hl=ko
Android에서 Firebase 클라우드 메시징 클라이언트 앱 설정
build.gradle 수정 이후 sync now, 오류가 생긴다면 google-services.json 파일을 다시 다운받아서 복사, 프로젝트 폴더 안의 build 폴더와 app 폴더 안에 있는 build 폴더를 삭제 한 후 안드로이드 스튜디오 상단의 sync project with gradle files 클릭
FCM을 사용하려면 앱 프로젝트 안에 두 개의 서비스를 만들어야한다
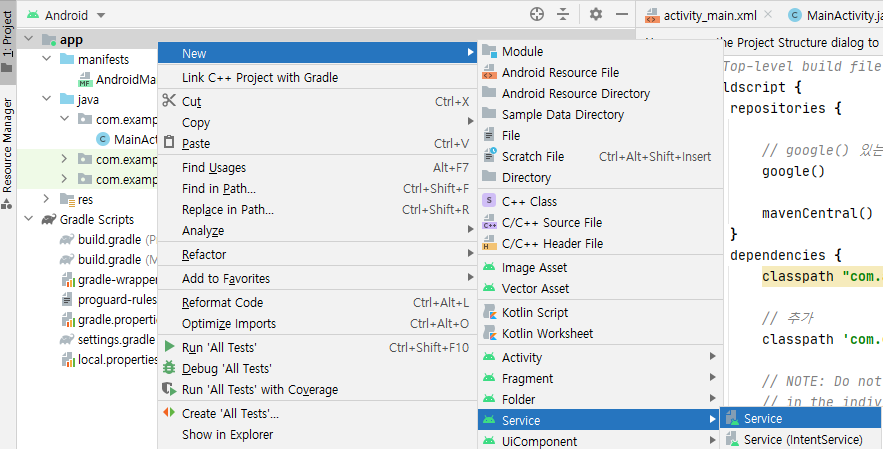
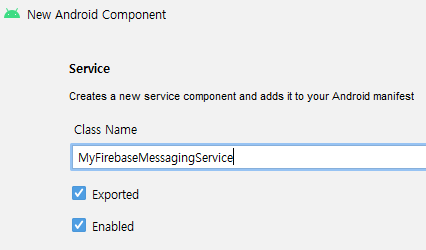
AndroidManifest.xml
<?xml version="1.0" encoding="utf-8"?>
<manifest xmlns:android="http://schemas.android.com/apk/res/android"
    package="com.example.a82_push">

    <!-- 푸시 서비스는 인터넷을 사용 -->
    <uses-permission android:name="android.permission.INTERNET" />

    <application
        android:allowBackup="true"
        android:icon="@mipmap/ic_launcher"
        android:label="@string/app_name"
        android:roundIcon="@mipmap/ic_launcher_round"
        android:supportsRtl="true"
        android:theme="@style/Theme.A82_Push">

        <!-- 인텐트 필터를 갖도록 설정 -->
        <service
            android:name=".MyFirebaseMessagingService"
            android:enabled="true"
            android:exported="true"
            android:stopWithTask="false">
            <intent-filter>
                <action android:name="com.google.firebase.MESSAGING_EVENT" />
            </intent-filter>
        </service>

        <activity
            android:name=".MainActivity"
            android:exported="true">
            <intent-filter>
                <action android:name="android.intent.action.MAIN" />

                <category android:name="android.intent.category.LAUNCHER" />
            </intent-filter>
        </activity>
    </application>

</manifest>
activity_main.xml
<?xml version="1.0" encoding="utf-8"?>
<LinearLayout xmlns:android="http://schemas.android.com/apk/res/android"
    xmlns:app="http://schemas.android.com/apk/res-auto"
    xmlns:tools="http://schemas.android.com/tools"
    android:layout_width="match_parent"
    android:layout_height="match_parent"
    android:orientation="vertical"
    tools:context=".MainActivity" >

    <Button
        android:id="@+id/button"
        android:layout_width="match_parent"
        android:layout_height="wrap_content"
        android:text="인스턴스 id 확인하기" />

    <TextView
        android:id="@+id/textView"
        android:layout_width="match_parent"
        android:layout_height="0dp"
        android:layout_weight="1"
        android:textSize="30sp" />

    <ScrollView
        android:layout_width="match_parent"
        android:layout_height="0dp"
        android:layout_weight="2"
        android:background="@android:color/holo_blue_bright">

        <LinearLayout
            android:layout_width="match_parent"
            android:layout_height="wrap_content"
            android:orientation="vertical">

            <TextView
                android:id="@+id/textView2"
                android:layout_width="match_parent"
                android:layout_height="wrap_content"
                android:textSize="20sp" />
        </LinearLayout>
    </ScrollView>
</LinearLayout>
MyFirebaseMessagingService.java
package com.example.a82_push;

import android.content.Context;
import android.content.Intent;
import android.util.Log;

import com.google.firebase.messaging.FirebaseMessagingService;
import com.google.firebase.messaging.RemoteMessage;

import java.util.Map;

// Service 클래스를 상속받던 것을 FirebaseMessagingService으로 수정
// 푸시 메세지를 전달받는 역할을 담당
// 구글 클라우드 서버에서 보내오는 메세지는 이 클래스에서 받을 수 있다
// onNewToken 메소드는 이 앱이 파이어베이스 서버에 등록되었을 때 호출
// 파라미터로 전달받는 토큰 정보는 이 앱의 등록 id를 의미함
// 이 단말로 메세지를 전달하고 싶은 쪽에서 이 등록 id를 사용할 수 있다
public class MyFirebaseMessagingService extends FirebaseMessagingService {

    private static final String TAG = "FMS";

    public MyFirebaseMessagingService() {

    }

    //    새로운 토큰을 확인했을 때 호출되는 메소드
    @Override
    public void onNewToken(String token) {
        super.onNewToken(token);

        Log.e(TAG, "onNewToken 호출됨 : " + token);
    }

    //    새로운 메세지를 받았을 때 호출되는 메소드
//    푸시 메세지를 받았을 때 그 내용 확인한 후 액티비티 쪽으로 보내기
    @Override
    public void onMessageReceived(RemoteMessage remoteMessage) {
//        RemoteMessage 객체의 정보를 확인하면 상대방이 클라우드 서버를 통해 보낸 푸시 메세지의 데이터를 확인할 수 있다
//        푸시 메세지를 보낼 때 contents를 키(Key)로 하여 사용자가 입력한 글자를 넣은 후 보낼 것이므로
//        메세지를 받았을 때도 contents를 키로 확인할 수 있다

        Log.d(TAG, "onMessageReceived 호출됨");

//        어디에서 전송한 것인지 발신자 코드 확인
        String from = remoteMessage.getFrom();

//        메세지를 전송할때 넣었던 데이터 확인
        Map<String, String> data = remoteMessage.getData();

        Log.d(TAG, "data : " + data);

//        사용자가 입력했던 발신 데이터 확인
        String contents = data.get("contents");

        Log.d(TAG, "from : " + from + ", contents : " + contents);

        sendToActivity(getApplicationContext(), from, contents);
    }

    //    액티비티 쪽으로 데이터를 보내기 위해 인텐트 객체를 만들고 startActivity 메소드 호출
    private void sendToActivity(Context context, String from, String contents) {
        Intent intent = new Intent(context, MainActivity.class);
        intent.putExtra("from", from);
        intent.putExtra("contents", contents);

//        액티비티가 아닌 곳에서 인텐트 전달
//        메인 액티비티가 메모리에 이미 있는 경우, 메인 액티비티의 onNewIntent 메소드로 데이터가 전달
        intent.addFlags(Intent.FLAG_ACTIVITY_NEW_TASK | Intent.FLAG_ACTIVITY_SINGLE_TOP | Intent.FLAG_ACTIVITY_CLEAR_TOP);
        context.startActivity(intent);
    }
}
MainActivity
package com.example.a82_push;

import androidx.annotation.NonNull;
import androidx.appcompat.app.AppCompatActivity;

import android.content.Intent;
import android.os.Bundle;
import android.util.Log;
import android.view.View;
import android.widget.Button;
import android.widget.TextView;

import com.google.android.gms.tasks.OnCompleteListener;
import com.google.android.gms.tasks.Task;
import com.google.firebase.installations.FirebaseInstallations;
import com.google.firebase.messaging.FirebaseMessaging;

public class MainActivity extends AppCompatActivity {

    TextView textView;
    TextView textView2;

    @Override
    protected void onCreate(Bundle savedInstanceState) {
        super.onCreate(savedInstanceState);
        setContentView(R.layout.activity_main);

        textView = findViewById(R.id.textView);
        textView2 = findViewById(R.id.textView2);

        FirebaseMessaging.getInstance().getToken().addOnCompleteListener(new OnCompleteListener<String>() {
            @Override
            public void onComplete(Task<String> task) {
                if (!task.isSuccessful()) {
                    Log.w("Main", "토큰 가져오기 실패", task.getException());
                    return;
                }

                String newToken = task.getResult();

                println("등록 id : " + newToken);
            }
        });

        Button button = findViewById(R.id.button);
        button.setOnClickListener(new View.OnClickListener() {
            @Override
            public void onClick(View view) {

//                https://stackoverflow.com/questions/64573538/firebase-instance-id-deprecation-of-getid-in-21-0-0
//                FirebaseInstanceId 객체는 폐기됨

                Task<String> instanceToken = FirebaseMessaging.getInstance().getToken();
                println("확인된 인스턴스 토큰 : " + instanceToken);

                Task<String> instanceId = FirebaseInstallations.getInstance().getId();
                println("확인된 인스턴스 ID : " + instanceId);
            }
        });


    }

    @Override
    protected void onNewIntent(Intent intent) {
        println("onNewIntent 호출");

        if (intent != null) {
            processIntent(intent);
        }

        super.onNewIntent(intent);
    }

    private void processIntent(Intent intent) {
        String from = intent.getStringExtra("from");

        if (from == null) {
            println("frim is null");
            return;
        }

        String contents = intent.getStringExtra("contents");

        println("DATA : " + from + ", " + contents);

        textView.setText("[" + from + "]로부터 숫신한 데이터 : " + contents);
    }

    public void println(String data) {
        textView2.append(data + "\n");
    }
}'안드로이드' 카테고리의 다른 글
| 센서 (0) | 2021.11.11 |
|---|---|
| 푸시 서비스 사용하기 - 메세지 전송 앱 만들기 (0) | 2021.11.10 |
| 상단 알림으로 알려주기 (0) | 2021.11.10 |
| 진동과 소리로 알려주기 (0) | 2021.11.10 |
| 지도에 아이콘 추가, 오버레이 (0) | 2021.11.09 |

